by Brooke P. Anderson, 4/20/2008
e-mail: brooke@electraforge.com
Introduction
What hardware and software do I need to get started?
Setting up the game
Maps, moving around, and selecting planes
Taking off and flying
Gauges and trim
Autopilot
View keys
Shooting and divebombing
Bombers, gunners, and level bombing
Landing and ending flight
Keys you need to know
Advanced keys
Radios
On-line flight
Conclusion
You’d like to try Aces High but know almost nothing about it. How do you get started? This guide tells you.
Aces High is an awesome multiplayer air-combat simulator. In playing it, you will fly simulated WWII aircraft in combat against other people. The planes in Aces High are modeled very realistically and handle and fly very much like real aircraft, which is something I love about the game.
This guide explains how to get set up to play Aces High and the information needed to get on-line, get in the air, navigate, communicate, and get into combat. It gives pointers on things to learn so that a beginner can increase his skill in the game, but it does not go into more advanced topics of air combat maneuvering. For that, you can read books such as Fighter Combat: Tactics and Maneuvering, by Robert L. Shaw or see http://www.electraforge.com/brooke/awtaman.html, a free manual that was written for Air Warrior, but the air-combat tips generally apply to most realistic air-combat simulators.
Also, this guide assumes that you already know how to fly an airplane. If you don’t, Aces High off-line mode is great for learning. You can just thrash around and learn on your own, but I recommend getting a book on how to fly, such as The Student Pilot's Flight Manual, by Kershner.
You will need a computer capable of running the game (2 GHz Pentium-class processor or better, 1 GB of RAM), a video card that supports DirectX 9, and a joystick. I also recommend a headset with attached microphone so that you can use the voice communications built into the game. Rudder pedals are nice, but you don’t need them right away -- you can see if you get into the game first before you buy them. If you want recommendations on what to buy, see the paragraph at the end of this section.
Install your joystick following manufacturer’s recommendations, or for most USB joysticks, you can just plug them in and configure them in Aces High. If you need to configure the joystick In Windows (which is uncommon these days, but some brands of joysticks might need it, for all I know), go into “Start->Control Panel->Game Controllers” and add your joystick if it isn’t already in the list. If you don’t see your exact joystick, pick whatever is the closest match (such as “4-button joystick with POV and throttle” or whatever). Once you have added it in the “Game Controllers” list, click on your joystick in the list, then click on “properties”, then the “Settings” tab, then on “Calibrate”. Follow the calibration instructions.
If you do have pedals, do the same thing for them as you did with the joystick.
For your headphones with attached mic, plug them into your sound card. In Windows, go into “Start->Control Panel->Sounds and Audio Devices”. Click on the “Audio” tab, then in the “Sound Playback” area click on the “Advanced” button, and make sure your speakers are set for “Stereo Headphones”. Click on the “Volume” button in "Sound Playback", and make sure that Microphone is muted (so that you aren’t hearing in your own headphones everything you say into your microphone). In the “Sound Recording” area, click on “Volume” and make sure Microphone is selected and that the balance slider is in the middle and that the volume slider is in the middle of its range (which you can adjust later if you want to select how loud sound from your microphone is). Do the same for the “Voice” tab as you did with the “Audio” tab.
To test your headphones, go into the “Sounds” tab, select a sound, and click on the play button (the button with the black triangle on it) to make sure you hear the sound in your headphones. To test your microphone, go into “Start->All Programs->Accessories->Entertainment->Sound Recorder”. Click on the record button (the one with the red circle on it) and say some things. Then click on the stop button (with the black square), and then the play button (black triangle). See that you hear what you recorded.
You will need the Aces High game itself. Go to http://www.hitechcreations.com/ and click on the “get started now” graphic or click on “Downloads”, download the game, and install it.
If you are looking for recommendations on items to buy, here is a fairly inexpensive set of stuff. For graphics cards, you can get a $100 (or better) nVidia GeForce or ATI Radeon card from http://www.newegg.com/ , and that should do the trick. For a joystick, I like CH Products Flightsticks (such as the CH Products Flightstick Pro USB for about $70 from Amazon.com), which have a throttle wheel as well. Also, if you want rudder pedals, I like the CH Products Pro Pedals USB (about $100 at Amazon.com). You don’t absolutely need rudder pedals right away (as you can check the game out without them for a while to see if you like it -- then get pedals if you do). If you are on a very tight budget, you can get a cheap Saitek joystick that will do decently well, such as the Saitek ST 290 Pro or Cyborg Evo (about $25-$35 at Amazon.com) -- but I'm a big fan of the CH Products joysticks. For a headset and mic, I recommend the Koss CS-100. You can get them for about $20 at Amazon.com. I strongly recommend getting a headset with a mic -- voice communication is very, very useful.
After starting Aces High software, select "Offline Practice".
Then select "Options", then "Controls", and then "Calibrate Joystick" (i.e., "Options->Controls->Calibrate Joystick" as shorthand notation for this set of selections). Follow the instructions to calibrate your joystick (and pedals if they are attached).
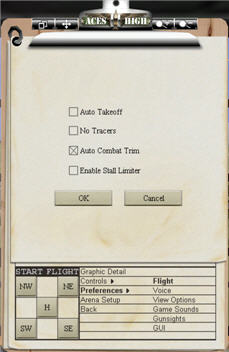
Click on "Preferences", then "Flight" (i.e., "Options->Preferences->Flight"). Turn on “Auto Combat Trim”. If you aren't used to flying yet (i.e., don't know what a "stall" is), turn on the options for "Auto Takeoff" and "Enable Stall Limiter". If you do know how to fly, turn off the options for "Auto Takeoff" and "Enable Stall Limiter". Auto Takeoff allows you, once you launch your plane, to give full throttle, and the Aces High program will take your airplane off for you. Stall Limiter makes it so that you can't pull back on your stick and stall your aircraft.
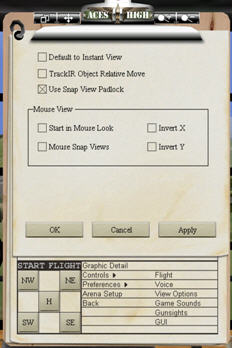
Go into "View Options” ("Options->Preferences->View Options") and make sure “Start in Mouse Look” is unchecked. It is very distracting to start in this mode, in my opinion.
Click on “Options->Controls->Map Controllers”. The general use of this settings area is to make sure your joystick inputs are selected for each appropriate action in the game (like pitch and roll). If you have installed only a joystick, it is likely set up correctly already. Under some circumstances, it is possible for the game not to default to the correct settings (such as not using the joystick or such as using your pedals for pitch and roll and your joystick for rudder input). In such cases, you will have to sort it out. In the "Select Controller" dropdown menu, select your joystick (for example, "CH FLIGHTSTICK PRO" is shown in the following picture).
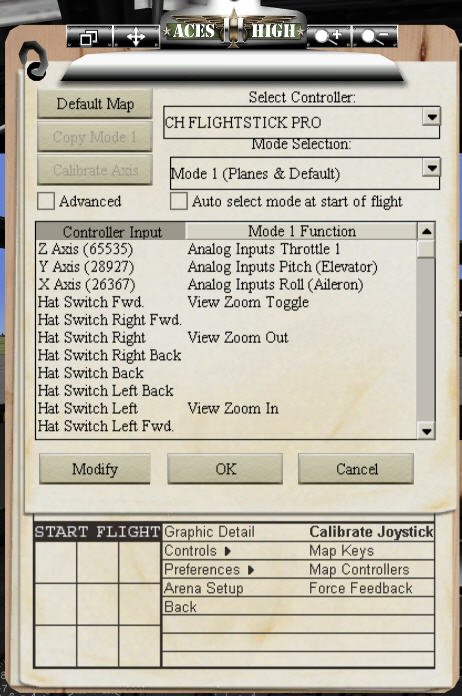
The items in the “Controller Input” column on the left are the names of the control inputs (such as "Z Axis", "Y Axis", "Hat Switch Left", etc.). The items in the “Mode 1 Function” column are the functions you attribute to each control input (such as "Analog Inputs Throttle 1", "Analog Inputs Pitch (Elevator)", etc.). If you need to change any of your settings, click on the Controller Input you want to modify, then click the "Modify" button, and select the function you want that input to have. Usual settings are:
Z Axis -> Analog Inputs Throttle 1
Y Axis -> Analog Inputs Pitch (Elevator)
X Axis -> Analog Inputs Roll (Aileron)
Button 0 -> Global Fire Primary
Button 1 -> Global Fire Secondary
Button 4 (or Button 3 depending on what you like) -> Global Fire All Guns
Set up the rest of the buttons, hat switches, etc. as you like.
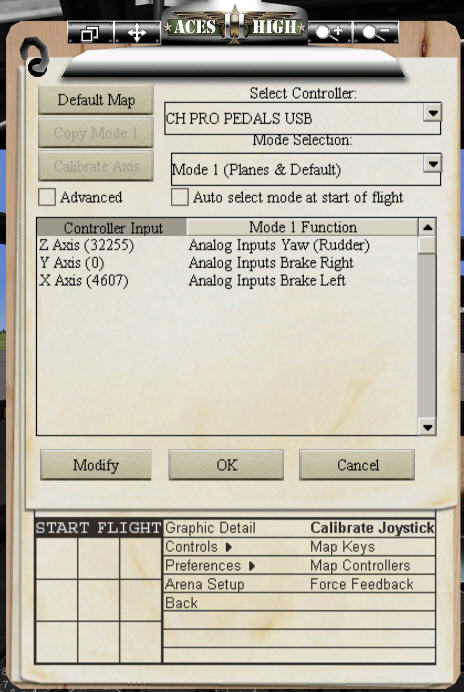
If you have pedals installed, select them now in the "Select Controller" dropdown menu. You should set things up (if they aren't so already) as follows:
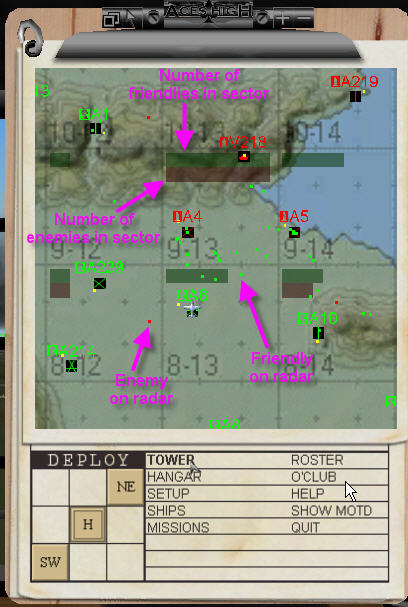
Start the game and pick “Offline Practice” for now. You’ll see a map with your plane symbol in the middle of it at an airfield. Airfields have names like “A1”. Vehicle bases have names like “V3”, and carriers have names like “C13”. You can scroll the map around by moving the mouse cursor inside it, clicking your left mouse button, and moving the mouse. You can move to an airfield by double clicking on it. You can zoom in and out on the map with the “Insert” and “Delete” keys on the keyboard. Colors of the airfields show which country owns them. Flashing airfields are under attack. The squares on the map are sectors, which are 25 miles by 25 miles. Boxes of color in the sectors show how many friendly and enemy aircraft are in the sector. Hitting the “Esc” key minimizes and brings back up the clipboard on which the map appears.
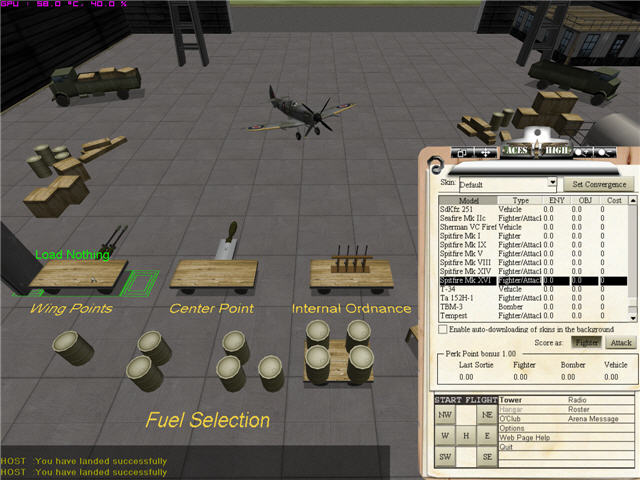
To get an airplane, click on the “hangar” option. You will now have the ability to pick an airplane, pick its fuel, pick its weapons, set the convergence of the guns, and pick for some planes whether you want your flight scored as a fighter mission or an attack mission. In the on-line game, not all airfields allow all plane types.
Pick a “Spitfire Mk XVI”. You will see things labeled such as "Wing Points", "Center Point", “Internal Ordinance”, and “Fuel Selection”. For some other planes, you will get other options of things to load (other points on which to load bombs or rockets, other gun choices, and so on). Load 100% fuel and nothing on your wing points or center point for now.
On the clipboard, pick a direction to take off. Depending on the field you are at, you can pick things like “H” for hangar, or “N”, “S”, etc. for being placed on the runway ready to takeoff heading north, south, etc. Click on one of them, and you will appear in your plane at the start of a runway. If you have Auto Takeoff enabled (see above), your engine will start, and if your throttle is set at more than zero, your plane will start to roll down the runway.
If you want to get out of your airplane, bring up the clipboard and select "End Sortie". If you are in the hangar and want to get back to the tower from the hangar, get your clipboard, and select “Tower”. That will give you a map and allow you to move to another airfield, go into the hangar and select a different plane, and so on.
Once you are on the runway in your plane, if you have Auto Takeoff enabled (see above), your engine will start. Give you plane full throttle, and the program will take the plane off for you.
If you don't have Auto Takeoff enabled, press “e” to start the engines. Give your plane full throttle and start rolling down the runway. Aces High has very realistic modeling, and the planes will tend to veer off to the side due to p factor (an effect of the prop). Correct with some rudder to keep going down the runway and not veer off the runway. If you don’t have pedals, use the “a” key to add an increment of left rudder, “d” to add an increment of right rudder, and “s” to center the rudder. So, you can give it a quick 2 clicks to counter the veering, if you over correct, click “s” to center the rudder, give it a click or two again, and so on. If you are having problems with steering on the ground with one of the tail-dragger planes such as the SpitV, you can take a P-38, which (with its two counter-rotating props and tricycle gear) is easy to handle on takeoff.
Once your tail comes up off the runway (for a tail dragger), wait a few seconds, then pull back gently on the stick and you should get airborne. Once in the air, press “g” to retract gear, and you are flying. If you are in a P-38, hold the stick back a bit as you roll down the runway and wait for the plane to get airborne, then press “g” to retract gear.
Instructions on how to fly an airplane are outside the scope of this beginner’s guide. If you want a reference on flying a plane, I suggest a book like The Student Pilot's Flight Manual, by Kershner.
If you have not enabled Enable Stall Limiter (see above), while flying around, you can stall if you are flying too slowly and pull the stick back. You will hear the stall horn buzz. At first, it will be a soft sound, and you are nearing a stall. As the buzzer gets louder, you are getting closer to a stall. When the buzzer is on loudly and solid and the plane if experiencing buffet (shaking), you are in a stall -- and you will know it from the way that plane isn’t handling well. Some planes will roll rapidly (from prop torque). Others will just mush through the air. Also while flying, you can black out if you pull too many g’s. (Your screen will go black.) You can red out by pushing too many negative g’s -- the blood rushes to your head. (Your screen will go red.)
You can use “p” to turn on war emergency power (“wep”) to get extra speed in an emergency and use of one notch of flaps at speed for some planes (like the P-51) for extra maneuverability or more rapid speed loss.
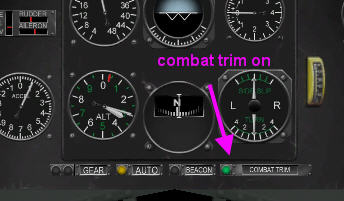
It’s important to know most of the gauges. Each aircraft has them in different places, but you’ll get to know the ones you fly. Make sure you know where the altimeter, vertical climb, compass, and fuel gauges are. Also, the combat-trim indicator is useful. On the SpitV, you need to press on the numeric keypad the “0” and “8” keys simultaneously to look forward down to see it on your panel. It should be lit green. If not, press “Ctrl-x” to toggle combat trim on and off. You want it on always unless you want to get into the fine points of trim control -- an advanced topic. See http://users.andara.com/~sconrad/ for a great description of trim in lots of detail.
The autopilot is very frequently used in Aces High. You use the “x” key to turn on autopilot to have your plane fly straight and level. This is useful while checking the map, typing messages, etc. Another very useful mode of the autopilot is autoclimb. This is used a lot on climbing your plane to altitude at approximately maximum sustainable rate of climb. Use “Alt-x” to turn on autoclimb. Autoclimb will get your plane to about 150-160 mph indicated airspeed or so (depending on the plane) and keep it there by climbing. If you engage the autoclimb autopilot when you are below that speed, the autopilot will dive your plane to get it to 150 or so, then enter the climb -- so don’t do it right off takeoff when you don’t have 150 mph yet. Basically, it just uses dive/climb to control your speed and keep it at 150 or so.
To disengage the autopilot, you can hit “x” or “Alt-x” again, or just push your joystick left or right until the autopilot disengages.
Being able as second nature to look around in the game is essential to combat. You will need to learn the view keys by heart and use them without much thought. They are all accessible on the number pad. “4” looks left, “6” looks right, “2” looks back, “5” looks up, and “8” looks forward. Combinations of these keys do expected things: “8” and “5” looks forward and up, “2” and “5” looks back and up, “4” and “2” looks left back, “4” and “5” looks left up, and so on.
Practice keeping things in sight while you maneuver. Get up to about 5k feel altitude. Fly over something on the ground and do a roll to your left. Press “4” to look left until you have it in sight, then “4” and “5” to keep it in sight as you roll more, then “5”, then “5” and “6”, then “6”. Try the same things rolling to the right (“6”, then “6” and “5”, then “5”, and so on). Try the same thing doing loops: look forward up (“8” and “5”), then up (“5”), then back and up (“2” and “5”), then back (“2”).
Once you are able to fly around, you can shoot at things. Go off-line and take up an aircraft of your choice. First, try shooting buildings on the ground. Next, try shooting at the drones that circle the airfield you take off from. (Red icons indicate enemies -- green icons indicate allies.) For air combat, you will need to appropriately lead your target. This is the subject of much practice and learning.
Your joystick button 1 will shoot the main guns, and joystick button 2 will fire the secondary guns. What is main and what is secondary varies depending on aircraft. For planes with just machine guns, button 1 usually shoots half of them and button 2 the other half. For planes with machine guns and cannon, button 1 usually shoots the machine guns and button 2 the cannons.
A more advanced topic is setting gun convergence. You can set this in the hangar (there is a “set convergence” button). I like to set the convergence of some of my secondary guns to 300 yards and primary at 400 yards. That way, I use my primaries to fire at longer ranges, and once I’m in close, I open up with my secondaries as well as primaries.
Bombs (which can be loaded on dive bombers and on some fighters) are dropped usually with button 2. Bombs need some amount of travel through the air to arm themselves -- an acceptable rule of thumb is to drop bombs more than 600 ft above the ground level. Dropping too low means they won’t detonate. Also, some bombs are big enough to blow you up if you drop them too low and are right over them when they go off. Your screen will show you what ordinance is loaded for button 1 and what for button 2. Pressing the “Backspace” key will toggle through the various options for button 2 (such as rockets, bombs, guns, etc. on planes that might have that much ordinance loaded).
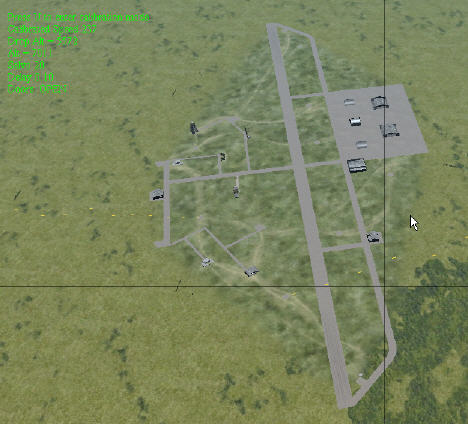
To dive bomb, you first need some altitude. Once over the target push your nose over or roll inverted and dive steeply or vertically over the target. It is often useful to chop throttle in your dive. Also, some aircraft have dive brakes for use in dive-bombing runs. Learning how to dive bomb and hit your target, like air-to-air combat, takes practice.
With bomber aircraft, you can fly a single airplane or select “formation” and have two additional aircraft fly close formation with you and follow you around (assuming you don’t make turns that are too tight, in which case, they will lose you).
In bombers and various other attack aircraft (such as dive bombers and torpedo planes), you often have gunner positions in the aircraft. A person can join you as your gunner (you will see a dialog box pop up asking you to allow the person to join if they try it). Or you can jump to gunner positions by pressing the “2”, “3”, and so on keys. Pressing the “1” key gets you back into the pilot position. When a gunner shoots from a particular gunner position, all other guns on your aircraft and the aircraft in close formation with you that can aim at the target will also fire (as long as the button you are pressing is given the function such as "Global Fire All Guns"). This gives bombers a lot of coordinated firepower. (If you don't see guns from your drone bombers firing, you probably are not pushing a firing button that fires all guns, but only the gun you are at.)
To do level bombing (where you fly straight and level and drop bombs), aim to over-fly the target, then press the “F6” key to get into bombardier mode. You will need to calibrate your bomb sight by pressing “u” to get into calibration mode, then “y” for at least 2 seconds to calibrate speed of the aircraft, then “u” again to get out of calibration mode. Now you will see through the bombsight. You can zoom in and out with “z” and the “[“ and “]” keys. Make sure you open your bay doors with “o”. Press joystick button 2 to drop bombs. To toggle to another set of bombs, press the “Backspace” key. (Some bombers have internal bombs and external bombs, and you can toggle between them.)
You can adjust the heading of the bomber from within bombsight mode by using the joystick. Moving it left will turn your bomber left, and vice versa for right.
You can change the number of bombs that are dropped with a single button-2 press by using the “.salvo” command. Typing “/”, then “.salvo 10”, then the “Enter” key will set up your bomber to drop 10 bombs (or as many as are left if less than 10) each time you press the drop button. You can also change how quickly bombs are released with the “.delay” command. If you want 0.05 seconds between those 10 bombs, you’d enter “.delay 0.05”.
Once you are done dropping your bombs, you can get back into pilot mode by pressing the “F1” key.
I like to fly quickly to the airport then, once low and near the end of the runway, pull throttle all the way back, and circle off the end of the runway. I circle until I get under 200 mph then start dropping flaps. At under about 140 mph, I drop my gear. Put flaps down by hitting the "q" key. Some fighters have flaps settings of only "up" and "down" and one press of "q" puts them all the way down, but other fighters have several notches of flaps, and you press "q" to put them down to the next notch. You raise flaps a notch at a time with the "w" key.
On most planes, you can lower your landing gear at about 140 mph or so or less (with the "g" key). If you hear creaking, groaning noises, you are going too fast, and your landing gear (if you don’t slow down) will eventually break off.
Once I've got my gear and flaps down, I adjust my throttle to keep my speed at or a little above 100 mph for most fighters. I line up with the end of the runway and glide in. Once over the end of the runway, I reduce throttle to zero or to just a very small amount and stay level a little above the ground until my speed bleeds off, and I ease it down onto the runway.
Many planes in Aces High are tail draggers. Ground handling is much more tricky. Once you are on the ground and slow enough, you can pull the stick all the way back. This locks the tail wheel, and you will find that you can go straight much more easily and don’t need to constantly adjust with rudder.
Once you speed is low, you can apply wheel brakes to come to a stop. Then you can press “e” to turn off the engines, press the “/” key to get to the radio, and type “.ef” and press the “Enter” key to end flight. Or select "End Sortie" from the clipboard.

Off-line, you can enter “.ef” in flight to end flight. On-line, you have to be on the ground and stopped before it will let you end flight.
a,s,d = +1 rudder click left, center, +1 click right (if you don’t have rudder
pedals)
esc = clipboard (map and other info)
` = toggle message window size (for typed messages from other players)
/ = radio 1 (then type your message, then press Enter key)
Shift-/ = radio 2
Insert = zoom map in (when looking at a map on the chipboard)
Delete = zoom map out
F12 = range mic (press it, talk, then release it for pilots in a radius to hear
you)
t = voice mic (same mic as F12, but not ranged -- sends to whatever channel
radio 5 tuned to)
e = start/stop engine
p = toggle war emergency power (if you need more speed for a bit, but it runs
out after a while)
q = lower flaps a notch
w = raise flaps a notch
q = shift up in vehicle
w = shift down in vehicle
x = toggle autopilot level (when on, plane will fly straight and level)
Alt-x = toggle autopilot climb (when on, plane will hold maximum climb rate)
Ctrl-x = toggle combat trim (keep this on almost always, as it auto trims the
plane)
Ctrl-d = toggle display damage (to see what’s damaged on plane)
g = gear up/down
u = toggle bombsight calibration mode
y = press to start speed measure, release to end speed measure
Space = wheel brakes
Enter,Enter,Enter = bail out (press Enter three times)
\ = select primary weapon (select your button 1 weapon)
[Backspace] = select secondary weapon (select your button 2 weapon)
o = open bomb bay doors (do this before dropping bombs), also open of parachute
after bailout (do this before you hit the ground)
1 = position 1 in plane (the pilot’s position)
2 = gunner postion 2
3 = (and so on)
Ctrl-1 = jump to formation plane 1 (jump into the 1st plane in your formation)
Ctrl-2 = jump to formation plane 2
Ctrl-3 = (and so on)
F1 = default (pilot) view
F6 = bombardier view (for bombsight and getting into bombardier mode)
F10 = save head position
t = tunable mic (press to talk to whoever is tuned to the channel of your radio
5)
[ = zoom in (when zoom mode is on)
] = zoom out
z = toggle zoom (zoom your view out the aircraft’s windows)
0,1,2,3,4,5,6,7,8,9 = view keys on keypad
Page Up = move head up
Page Down = move head down
forward arrow = move head forward
back arrow = move head back
left arrow = move head left
right arrow = move head right
.ef = end flight (use to end mission when on ground and stopped)
.radio radioNumber channelNumber = tune radio radioNumber to channel channelNumber
.join gameID = join player gameID, such as being his gunner
.unjoin gameID = unjoin
.accept gameID = accept a join
.decline gameID = decline a join
.salvo numberBombs = set to drop this many bombs on button press
- on keypad = lower engine RPM
+ on keypad = higher engine RPM
E6B on clipboard = fuel-consumption computer and true airspeed
You have 5 radios. Radios 1 through 4 are for typed messages. Radio 5 is your voice-communication radio. The following are the channels radios can be tuned to with the .radio command.
1 = all
2 = country
3 = room
4 = squad
5 = mission
6 = kill messages
100-199 = tuned country
200-299 = tuned all
gameID = private to user with given game ID
Normal setup of radios is for radio 1 to be tuned to channel 2 (country) and radio 2 to be tuned to channel 200, which most people on all countries can read. Then use the “F12” key for range mic for most short-range communication (whoever in your country is close will hear you) or “t” for voice communication to whatever channel radio 5 is tuned to. Thus, to type a message to all in your country, press “/”, type your message, then press the “Enter” key. To talk to everyone in the game, press “Shift-/”, type your message, then press “Enter”. To talk via voice to pilots within a range of you, press “F12” and hold it down, talk, then release the “F12” key. To see if your voice comm. is working, press “F12”, say “Radio check,” then release “F12”. People should respond back if they can hear you. “Five by five” is another way to say “loud and clear.”
To get on-line, start up Aces High and select “Online Arenas.” You will need to have an account or set one up. It is fairly self-explanatory to do so. You can get a two-week trial account for free. After that, you have to pay $15/month to play.
Once you are on-line, select one of the Late War Main arenas (as these have more players). Here, there are three countries that fight each other: Bishops, Knights, and Rooks. You will start out at an airfield. To find out where the action is, use the “bar radar” or boxes of color to find out the number of friendlies and enemies in a sector as described in the “Maps, moving around, and selecting planes” section. Also, you can see on the map if a field is flashing, it is under attack. If a field has red dots all around it, enemies are nearby and showing up on radar. You won’t always see enemies on radar. If they are low (under about 200 feet) or if the radar installation is destroyed or if you are out of range of a radar installation, you won’t see enemies show up on radar.
You can pick someplace with just a few enemies and lots of friendlies to get used to flying in combat. Or, if you want to jump into lots of action, pick a place with lots of enemies around. Until you are proficient at combat flying, you will get shot down a lot. Don’t feel bad -- it takes a lot of practice to be a good fighter pilot, Aces High is a realistic game, and you are flying against other people, many of whom are quite good.
Also, if you want help from Aces High trainers, you can ask for one on the radio or visit the Training Arena and ask around.
Most people who fly Aces High are nice people, willing to help out. But like any public area with enough people, there are jerks as well. If you encounter someone who is a jerk, don't let it bother you -- that's his problem. There are many more folks like me who are happy that you are trying out a game that many of us feel is so excellent with a great community behind it.
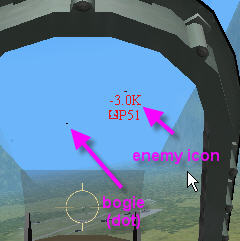
When you are airborne, look around. Planes show up as “bogies” or dots initially without identifiers by them. At that stage, you can’t tell (unless you know by clues on radar) whether the plane is an enemy or a countryman. Once you get close enough for visual identification, an icon will appear near the plane, and you will know.
This guide is not for teaching you how to be a good combat pilot -- it is just a guide to show you how to get started in Aces High. If you have suggestions for making it better for its intended purpose, please send me e-mail.
See you in the virtual skies of Aces High!
-- Brooke
by Brooke P. Anderson
e-mail: brooke@electraforge.com
Click here to go back to my main gaming page.