The revision to Rangoon '42
Author : DoK
Date : 2004-10-31 08:53
Path: Aces High
Scenarios > Rangoon
'42
Page Title: Revised Rangoon '42 Description
Extra key :
rangoon
Submitted by : DoK
View or add comments : (1) ![]()
Average
members rating : 
Rangoon '42
"The Sum Of All Hate"
v1.5.0 - 21-Jun-2008
IMPORTANT NOTE: This is a re-tooling of the original Rangoon event. The release of AH 2.1 and the impending holiday season impacted registration and overall stability, so we decided to scale back and get the event done before year's end with the people we had. This rule set is considerably simpler than the original, but the event is still very difficult. The new event is only 4 missions long.
Fighter forces will be meeting co-altitude, which compensates for the closer odds. Allied fighters won't have the same altitude cushion when meeting the IJA Zeros which makes the fighting much more difficult for them. At the same time, the IJA has fewer planes to work with so much be more careful with how they're used.
We will need 12-20 people to volunteer to switch to the IJA side to make this event fly.
Index
- Description
- Forces
- Scenario Environment
- Operational Rules
- Scoring
- Mission Timeline
- Notes and Special Rules
1 Description
A semi-hypothetical scenario of the Japanese attack on Rangoon early in 1942. In this case, a mixed Allied force is defending the city from air attack. The IJA is trying to gain control of the skies and bomb the defenses to enable a coordinated ground-naval assault. This was one of the first encounters between the AVG and IJA where the Japanese started to develop tactics to counter the stronger, faster US fighters. It was also one of the last desperate stands for the British-led forces before falling back to India.
In real life, the Allies were facing much older and slower Japanese planes. Since we do not have these available, A6M Zeros and Ju-88's (as Betty bombers) are being used, but in smaller numbers than actually took place relative to the Allied planes. The situation being depicted is that after an initial bloody nose was delivered by the AVG and RAF, the Japanese pulled in stronger air assets (using more modern aircraft) to wipe the skies over Rangoon clean so they could take the city.
Commentary: This is still a tough event for both sides. Fighters will meet co-altitude which is good for the IJA, but numbers are much closer which gives the IJA fewer options - the balance of close escort to sweeps is much keener.
1.1 Orders
Allies: Prevent the destruction of Rangoon and fighter assets.
Japan: Bomb Rangoon, inflict damage on Allied air assets.
2 FORCES
2.1 FORCE DESCRIPTION
The Allies have a mixed bag of defending fighters, supported by a flight of Bristol Beaufighters for recon and bomber attack.
The IJA has a solid package of A6M Zeroes and 2 medium bomber squadrons. A long-range fighter group of Ki-46-III's and Naval A6M5 Zeroes is capable of staying with the bombers for the duration of their flight.
2.2 Force Chart
| ALLIED FORCES | JAPANESE FORCES | |
|---|---|---|
|
HQ @ 4 P40E |
HQ @ 4 A6M5 |
2.3 Special Rules
- US "Reserve" squadron allows the first 12 Allied pilots who die to replane in SBD's - everyone else is 1-life-to-live. SBD's kind of suck, but twin .50's are enough to finish off a Ju-88 or nail an A6M2 with a solid burst - they can be a last ditch defense over the city of pilots who died during the early intercept.
- IJA ESCORT flight are the only planes which may carry drop tanks. Basically they'll be the close escort duty and will be able to stay with the bombers without needing to refuel. They will NOT be allowed to freelance until after Allied fighters have been spotted in icon range.
- If we have extra players then there will be an auxillery squadron built on each side of A6M2's for IJA and Hurri I's/P40B's on the Allied side in a 3:2 ratio. So 10 extra players give the Allies 4 Hurri I/P40B and the IJA 6 A6M2.
3 SCENARIO ENVIRONMENT
3.1 Terrain
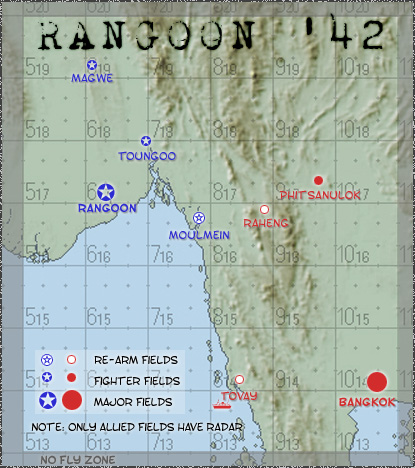
Notes:
- Central mountain range tops out at around 5000 ft.
- It's about a 6-sector long direct flight from Bangkok to Rangoon.
3.2 Arena Settings
3.2.1 Max Altitude
- Maximum cruise altitude for all fighters is 12,000 feet.
- Maximum cruise altitude for IJA bombers is 10,000 feet.
- If there are no identified (i.e. someone has had them in icon range) enemy dots visible, fighters MUST be at 12,000 feet or lower. So once combat concludes everyone goes back to their operational plans and resumes cruise altitudes.
- There is no minumum altitude - but there is AAA.
3.2.2 Radar
- Allies have dot-dar for 10 miles around their bases. No other radar is on.
- "Bar Radar" will kick in at 20,000 feet ... so no nosebleeds.
3.2.3 Rearming
- Allowed, but no replaning - if you crash/die you're done.
- Raheng and Tovay are available as a re-arm fields for the IJA FIGHTERS ONLY.
- Moulmein is available as a re-arm field for the Allied FIGHTERS ONLY.
- For the re-arm only fields, you may ONLY re-arm on the field. At the normal airbases, you may land-exit-launch.
- IJA bombers may only re-arm at Bangkok. This is why the total allowed mission time is 4 hours.
3.2.4 Time Limit
- Each mission runs dawn-to-dusk on an accelerated clock whereby the lit hours use about 4 hours of elapsed time.
- If the Allies decide to stand-down after their first wave, the mission for that "day" is over. This gives the Allies the option to "pour it on" if they sdo well with the first strike.
- A mission ends when all planes are down - that means if you launch a second wave late everyone MUST land at night - and suffer losses accordingly.
3.2.5 Fuel & Drop tanks
- Only the IJA recon flights can carry drop tanks. No other planes may carry drop tanks.
- Fuel multiplier will be set to 1.0.
3.2.6 Bombs and Ground Attack
- NO fighter aircraft on either side may carry bombs or attack surface targets.
- NO attacks on AAA, hangars, or radar is allowed.
3.2.7 Flight boundaries
- See map above. Planes are not allowed into the "no fly zone" unless pursued there. Once combat is resolved, the survivor(s) must return to the play area at once.
3.2.8 Clouds
- We wanted clouds but it just didn't make it.
3.2.9 Ditching and Landing
- Planes ditching at a friendly base are considered not lost (i.e. available for tomorrow's mission), but the player may not lanch again. If you ditch at a field, be sure to either snap a screenshot or have someone who can confirm you ditched safely.
- Planes ditching anywhere else are considered lost - same as being shot down. You simply do not ditch planes easily in the jungles of Burma. (If the terrain has a high tree density, you won't be able to ditch anyway.)
- Planes which land but sustain damage in the process - bend props, rip flaps, etc. - are considered the same as ditching at a friendly field. Your plane is not counted as killed, but you are done for the day. So be careful when you land.
- It is the CM's descretion how to assess the land vs. crash decision for some operational accidents. For instance, if frame rates get messed up due to plane density, if your joystick goes out of calibration when you launch, and so on.
4 OPERATIONAL RULES
Due to the abbreviated nature of this event, we're dispensing with attrition rules. However ...
4.1 One Life To Live
- Players only have one plane to fly in a mission. If you are shot down, ditch, crash, or some how destroy your plane you are done for the day.
- The sole exception to this is that the first 12 Allied players to get shot down may replane in Buffalo's (SBD) - the CM on duty will need to keep track of how many Allied flyers have being replaced this way. Allied flyers replaning in SBD's MUST check in with the CM and request a new ride.
4.2 Formation Rules
- Bombers cannot fly in smaller than squadron strength. This means the IJA can have at most two strike groups. Or they can combine everything into one large group.
- Bombers may NOT dogfight. Any kill awarded to the pilot seat of a Betty will be discarded. The IJA were pretty disciplined in terms of maintaining formation, so the bomber squadron CO's will be expected to keep their groups in tight formation to and from target.
- Bettys must launch with full internal bomb racks and full external stores of 250 pounders. The Ju-88 is a quicker more nimble plane than the Betty, so we need to "dirty it up" some.
- IJA/IJN fighters must patrol in at least half-squadron formations of 6. This means each plane must be in vis range of another plane in the squadron.
- Alled fighters must patrol/escort in no smaller than flight-size formations of 4. This means each plane must be in vis range of another plane in the flight.
5 SCORING
5.1 VICTORY POINTS
Points are pretty straightforward. The Allies get points for downing bombers and sinking ships. The Japanese get points for destroying buildings. Some structures are tougher to kill, but that's part of the planning. The Allies can try to under-cut a Japanese strike mission by sinking ships - but it's a gamble. It all comes down to if the Japanese bombers can get to target and back week after week. There are also bonuses for "blow-out" results.
|
There are a maximum of 18 surface targets the IJA can hit in a strike (so 36 max in a frame).
The "Bettys break formation" bonus basically is there to keep the Ju-88's from diving like maniacs towards the target or for home. That's not how the IJA flew. The Betty's must maintain a formation in level flight. If they decide to break or dive out and run on the deck to avoid getting shot down, that's a calculated risk as it effectively gives the Allies 3-kills worth of points. This rule is released once the Betty's are within a sector of Bangkok - then they can run for the safety of their AAA. The Betty's may also dump 500ft of altitude after their bomb run - a brief dive to regain speed from the turn for home.
|
6 MISSION TIMELINE
Time Event T-5 CM announces 5 minutes to launch T-0 (DAYBREAK) Both sides clear to launch planes T+15 Allies must have launched bombers by this time T+120 CM announces "Half Way Through Mission" T+230 CM makes "10 Minute Warning" T+240 (NIGHTFALL) Darkness settles on Rangoon - mission if effectively over T+270 A mysterious typhoon sweeps through the region and destroys any aircraft still in the air
If after the first strike is clear of enemy contacts and back over friendly soil, the IJA can inform the CM that the bombers are clear and that no further strikes are planned. At which point the CM can check with the people on the radio channels to see where everyone is at and confirm that the bombers are clear. At which point the CM will issue the "10 minute warning" for people to finish off who ever they're fight. After which the mission for the day is over.
Likewise in the case where all the bombers are wiped out, the CM can issue the 10 minute warning at that time.
It is unlikely that missions will go the full 4+ hours. More likely things will be done in about 2.5 hours due to losses. It just won't be wise to send another strike in if the bombers took losses on their first trip. However, if the IJA gets lucky and gets a strike in and out without a loss, they can opt to turn the strike group around for a second attack if there is time.
6.1 Mission Aborts
The IJA CO is the only CO which can call for a mission abort. This must be called prior to any bomber getting within a sector of Rangoon or an Allied airfield. Upon confirming this decision with the CM, the following events transpire:
- A 15-minute (real time) timer is started.
- The Betty bombers must immediately turn back towards a friendly base and are allowed to drop 2000 ft of altitude to make their escape. Any more than that and the formation break penalty is applied.
- 5 minutes into the abort timer, the Allied CO is informed of the abort (i.e. ground observers have relayed the change in direction of the Betty's back to Allied command).
- 10 minutes into the abort timer a "5 minute warning" is issue to all sides, indicating the amount of time left before the mission is ended.
- When the 15-minute abort timer expires, the mission ends and the logs are closed regardless of what people are doing. (The reason being that in real life it was much easier for a side to abort a mission and find a way safely home.)
- If the Allied Boston bombers were trying to make a bombing attack, they need to complete it before the timer expires.
Aborting a mission costs the IJA the "No bombs on Rangoon" bonus which is given to the Allies. But it also prevents a possibly huge loss if the bombers stood a good chance of being wiped out. There is no shame in calling an abort. In fact, there may be cases where it's not a defensive move at all. For instance, if the IJA fighters inflict very heavy losses on the Allied fighters but need to re-arm before returning to escort duty. This leaves the bombers less protected from a deep Allied patrol. But since the Allies won't have nearly as many fighters on the next mission, it may make sense to abort and take the operational victory of controlling the airspace into the next mission.
7 NOTES & SPECIAL STIPULATIONS
- Players may use the clock any way they see fit - with the proviso
that the bombers MUST make an attack each mission, that they MUST launch
no later than 15 minutes after dawn (and actually fly to target - not
just land and wait some more), and that 30 minutes after "dark" a typhoon
will sweep in and kill anything left in the air.
(So no screwing with idiotic stuff. I can assure who ever the IJA commander is that he won't win by getting cute with the clock - you have 15 minutes to work with for fighter sweeps, but that's it.)- This does raise the possibiliy of the fighters of both sides meeting in combat while the bombers are climbing back at their base, having time to rearm, and then fight again during the actual escort/intercept.
- Players may rearm at rearm points only at the re-arm fields, or by
exiting and replaning at the regular fields.
(I don't want to have lots of planes lost through taxiing accidents at the rearm points - that'd be absurd. But if you have the need to re-arm at a forward base, there should be some risk attached.) - Ramming - intentional ramming is NOT permitted. A few occurances are to be expected in each mission due to the close proximity of so many planes. But if an inappropriate number of planes are lost due to mid-air collisions then steps will be taken. This may include disabling enemy mid-airs and giving the injured side extra replacements to make up for the ramming activity.
- Vultching - NO. NOT ALLOWED. IF YOU'RE SEEING ENEMY AAA COMING AT YOU, YOU'RE TOO CLOSE. THE SOLE EXCEPTIONS ARE THE RE-ARM FIELDS AT RAGENG, TOVAY AND MOULMEIN.
CREDITS
- Scenario design: DoK
- Allied CO: Tilt
- Axis CO: Brooke