12/9/2004
From: Command Staff, IJAF
Mission 4 Orders, Rangoon, ‘42
VERY IMPORTANT: Because of new radar settings, all escort fighters should initially fly at 11k altitude. DO NOT CLIMB TO 12k YET. I will release fighters to climb to 12k once enemy fighters have found our formation.
IMPORTANT: Read the “Fuel Management” section. We will stretch fuel on this mission.
What you need to read: everything in this document except the sections specifically for squadrons you are not in. You need to have read the scenario description at:
http://www.gonzoville.com/scenarios/page.php?id=12
Remember the special rules:
- Bombers cannot break formation -- fly level and together.
- Bombers may not use forward guns.
- Bomber alt limit is 10k.
- Fighters should be at or lower than 12k if no enemy bogies are visible.
- If you die or ditch or bail, you are done piloting.
If you die, ditch, or bail, please join a bomber as a gunner. We will need gunners.
Overview
Mission 4 takes place on December 11th, 2004 at 12:00 noon Pacific time USA, 3 pm Eastern time USA, 8 PM in England, 9 PM in Poland. That is T-0. That is when we take off -- you will need to show up earlier than that as follows:
T-40 minutes: Squadron leaders show up.
T-35 minutes: Missing squadron leaders are replaced.
T-30 minutes: Other pilots show up.
T-25 minutes: Begin assigning walkons to any open spot.
T-15 minutes: Squadron leaders do quick briefing.
T-3 minutes: Planes go out onto runway positions.
T-0 minutes: We begin takeoffs as announced by CO.
Show up in the tower of the airfield listed as your “briefing field.” That’s where your squadron will assemble, then you will go to Bangkok at T-3.
The general format of this mission will be a single group of bombers at 10k altitude escorted on a very long route from Bangkok to Rangoon and back. We will have close escorts and detached escorts around them. In addition, we will have two squadrons of fighters performing an extended sweep and CAP.
Roster
Here is the command staff
for mission 4:
B1 -- bomber squadron 1, 9
Ju88A-4's, lead by Snak
B2 -- bomber squadron 2, 9
Ju88A-4's, lead by Leigh
A1 -- IJA squadron 1, 12
a6m2's, lead by Slvrfox
A2 -- IJA squadron 2, 12
a6m2's, lead by Bino
A3 -- IJA squadron 3, 12
a6m2's, lead by Badboy
N1 -- IJN squadron 1, 12
a6m5's, lead by Newman
N2 -- IJN squadron 2, 12
a6m5's, lead by Skyman
N3 -- IJN squadron 3, 12
a6m5's, lead by ROC
HQ -- HQ flight, 4 a6m5's,
lead by Yojimbo
LR -- LR escort, 4 Me110c's
and 4 a6m5's, lead by Ramzey
Here is the roster:
|
Callsign |
email |
m4_squad |
|
asw |
xxxx |
A1 |
|
Flob |
xxxx |
A1 |
|
Have |
xxxx |
A1 |
|
Jarski |
xxxx |
A1 |
|
mofa |
xxxx |
A1 |
|
RBug |
xxxx |
A1 |
|
SlvrFox |
xxxx |
A1 |
|
straffo |
xxxx |
A1 |
|
Wmaker |
xxxx |
A1 |
|
bino |
xxxx |
A2 |
|
brentlo |
xxxx |
A2 |
|
flyboy |
xxxx |
A2 |
|
glok |
xxxx |
A2 |
|
Kentso |
xxxx |
A2 |
|
AKNUTTZ |
xxxx |
A3 |
|
Badboy |
xxxx |
A3 |
|
Bingo |
xxxx |
A3 |
|
Brooke |
brooke@electraforge.com |
A3 |
|
debuman |
xxxx |
A3 |
|
GrimmCAF |
xxxx |
A3 |
|
KblrCAF |
xxxx |
A3 |
|
qe |
xxxx |
A3 |
|
ScotCAF |
xxxx |
A3 |
|
SkechCAF |
xxxx |
A3 |
|
skfgalpo |
xxxx |
A3 |
|
SKGnslgr |
xxxx |
A3 |
|
tonyki61 |
xxxx |
A3 |
|
anchrmn |
xxxx |
B1 |
|
leigh |
xxxx |
B2 |
|
seeker |
xxxx |
B1 |
|
Snak |
xxxx |
B1 |
|
Flossy |
xxxx |
B2 |
|
Simplex |
xxxx |
B2 |
|
Bazi |
xxxx |
HQ |
|
rob53 |
xxxx |
HQ |
|
shamus |
xxxx |
HQ |
|
yojimbo |
xxxx |
HQ |
|
1olo |
xxxx |
LR |
|
Adamec |
xxxx |
LR |
|
blue315 |
xxxx |
LR |
|
dasko |
xxxx |
LR |
|
Lucull |
xxxx |
LR |
|
piterkO |
xxxx |
LR |
|
Ramzey |
xxxx |
LR |
|
sebek |
xxxx |
LR |
|
airbumba |
xxxx |
N1 |
|
BOOT |
xxxx |
N1 |
|
DuBe |
xxxx |
N1 |
|
Eagle |
xxxx |
N1 |
|
HUN |
xxxx |
N1 |
|
KOOL |
xxxx |
N1 |
|
LeitWolf |
xxxx |
N1 |
|
Loddar |
xxxx |
N1 |
|
Mato |
xxxx |
N1 |
|
Newman |
xxxx |
N1 |
|
Vulcan |
xxxx |
N1 |
|
13Promet |
xxxx |
N2 |
|
dralex13 |
xxxx |
N2 |
|
Ed561 |
xxxx |
N2 |
|
Glas |
xxxx |
N2 |
|
Grayarea |
xxxx |
N2 |
|
Gremlin |
xxxx |
N2 |
|
klem |
xxxx |
N2 |
|
rdrSLAM |
xxxx |
N2 |
|
skyman |
xxxx |
N2 |
|
Taiaha |
xxxx |
N2 |
|
Witch |
xxxx |
N2 |
|
2851 |
xxxx |
N3 |
|
allmeta1 |
xxxx |
N3 |
|
ccvi |
xxxx |
N3 |
|
Inyo |
xxxx |
N3 |
|
maik |
xxxx |
N3 |
|
Ouaibe |
xxxx |
N3 |
|
ROC |
xxxx |
N3 |
|
Rompa |
xxxx |
N3 |
|
starbird |
xxxx |
N3 |
|
Tacker |
xxxx |
N3 |
|
TrueKill |
xxxx |
N3 |
|
VWE001 |
xxxx |
N3 |
|
xman332 |
xxxx |
N3 |
The following pilots did not
register for mission 3, but are encouraged to join us if they can:
|
Charge |
|
Simaril |
|
Drex |
|
ravs |
|
Vladd |
|
Kudzu |
|
jollyFE |
|
shubie |
|
TCFkas |
|
MRPLUTO |
|
Covey |
|
mech01 |
Tactics
Fuel Management
This mission will require a lot of time in flight. Bombers can fly at full power the whole time. When not in a fight or positioning for a fight, fighters should fly at max cruise settings (or lower if escorting bombers).
Hit the “Esc” key to get to your map, then click on the “E6B” to get the fuel calculator. It will show you max cruise settings for RPM and throttle manifold. Control your RPM with the “+” and “-“ keys on your keypad. I find that RPM control is buggy in this version of Aces High. If you have trouble reducing RPM, reduce throttle some, then try hitting the “-“ key. If you have trouble increasing RPM, try increasing throttle then hitting the “+” key. Go to full power if you are getting ready to enter a fight. If you aren’t, get back to cruise. You’ll need the fuel.
For Zeros, you should be able to fly cruise and keep up with the bombers consuming 70 gph. In a Bf100c, economy cruise will be about 130 gph.
Close Escort
Fly at 11k altitude initially. It is very important that you don’t reach 12k until the enemy already knows where we are, or we will tip them off. I will announce when it is OK to go to 12k.
Stay directly above -- or above and slightly ahead -- of the bomber assigned to you.
On enemies’ initial high-speed pass -- get on them at the top of their zoom climbs. You can do one of two things.
- You can roll inverted and dive down on them as they fly under you. But DO NOT turn around (a 180-degree turn) to get them as that will just put you way out of position.
- Or just stay up high and forget about diving on them during that initial pass -- you probably won’t hit them at that speed anyway.
Either way, the goal is to attack them and get on them at the top of their zoom climb after that first high-speed pass, so keep enough speed or altitude to do that.
Once an enemy has done that initial high-speed pass, he will not have as much energy, and you can now attack him as you see fit to keep the bombers’ tails clear.
Do not bunch up on enemies. If an enemy already has two IJAF fighters on him, you should not be attacking that same enemy. Keep your position and your ability to attack a new enemy coming in.
Stick with the bomber assigned to you and keep its tail clear. If your bomber gets shot down, pick a new bomber and stick with it. Do not chase enemies so far away from your bomber that you can’t get back.
Detached Escort
Fly at 11k altitude initially. It is very important that you don’t reach 12k until the enemy contacts us, or we will tip them off. Once someone in your squadron icons enemies (such as your forward scout), then you can climb to fight and return to 12k thereafter -- but before we see enemies that first time, stay at 11k.
If you are flying detached escort, your job is to stay within dot range (but usually outside icon range) of the bombers you are protecting and to attack enemies you come across except for a couple of exceptions. First, if there are already two IJAF fighters on an enemy, you should not attack that same enemy. Get into a position to protect the bombers and wait for other enemies to show up. Second, do not pursue an enemy below 6000 feet or get pulled outside dot visibility of the bombers. If our detached escort gets pulled off the bombers, it leaves the bombers vulnerable. You can’t clear the way for bombers if you are not even near the bombers.
When guarding bombers, detached escort should stay within dot visibility range of the bombers but outside icon range. Spread your folks out. Have at least two planes in each squadron at icon-range limit in front of other planes in the squadron to act as early warning on incoming enemies. If you spot enemy bogies, go to full throttle. When your front planes (or any other planes in your squadron) icon enemy fighters, everyone should climb if needed to engage the enemies. Get on those enemy fighters if they are going after the bombers, but no more than 2 on every enemy.
Do not let any enemy fighters through you if you can help it. Even enemies coming in 1’s, 2’s, or 3’s -- stop them or drive them off. But not more than 2 IJAF fighters on every enemy plane.
Sweep
Fly at 12k initially and max cruise settings. When you spot enemy bogies (dots), go to full power. If you identify enemies (icon them), you can climb as you see fit. Once you don’t see enemies anymore (no bogies or dots), get back under 12k and to max cruise settings.
Your role is first to disrupt the enemy and to CAP the Rangoon towns area. Fly in one big group on the way to your patrol area. Join back up after a fight. When not engaged, get under 12k for cruising to your next destination. If you are at 12k or higher, the enemy will see you on bar radar and know where you are, which won’t be as disruptive as if you just show up in places unannounced.
If some of you get engaged, the rest should stay in the area to lend support or keep altitude in preparation for more enemies coming in. Once the fight is over, join back up and go to your next destination. If you don’t stick together, by the time you rampage around some then CAP Rangoon, there won’t be many of you left.
If you get engaged, don’t all blow your altitude to attack some enemies. If two IJAF fighters are on an enemy, keep your altitude, stay over your comrades, and stay ready for more allies joining the fight.
Goal #1: If you find P-40’s, kill them
Goal #2: Annoy and confuse the enemy, but stay alive with enough planes to clear out Rangoon area for the bombers when they are coming in.
You can spread out a lot once you are in your patrol area, but stay together on the way into Rangoon radar area that first time.
Do not linger in AAA near the fields. We don’t want to lose aircraft to AAA. Also, we are precluded from attacking fighters that are landing or taking off. We don’t want to be down in the anti-aircraft fire at the fields anyway.
Mission Maps
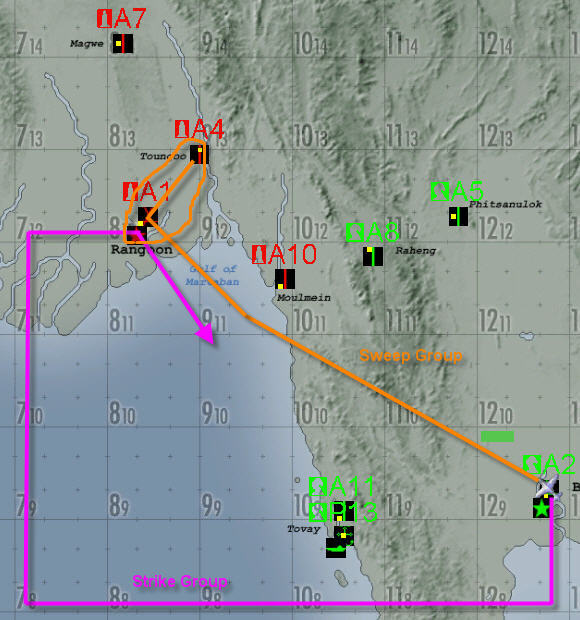
Figure 1: Above is mission map.
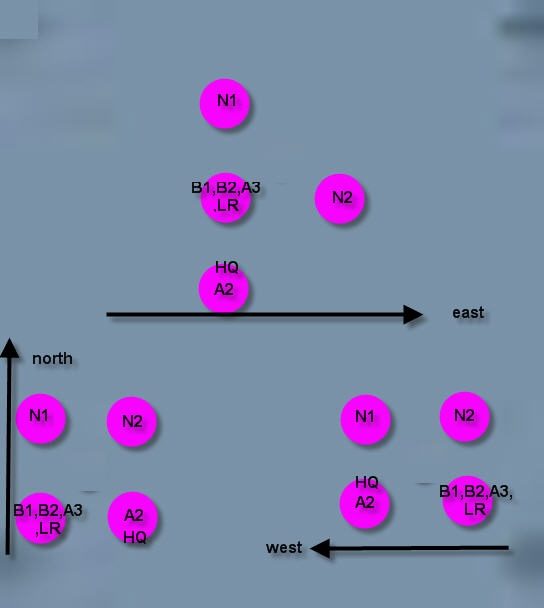
Figure 2: Above is layout of squadrons in Strike Group.
Figure 3: There is no figure 3 this time.
Target Map
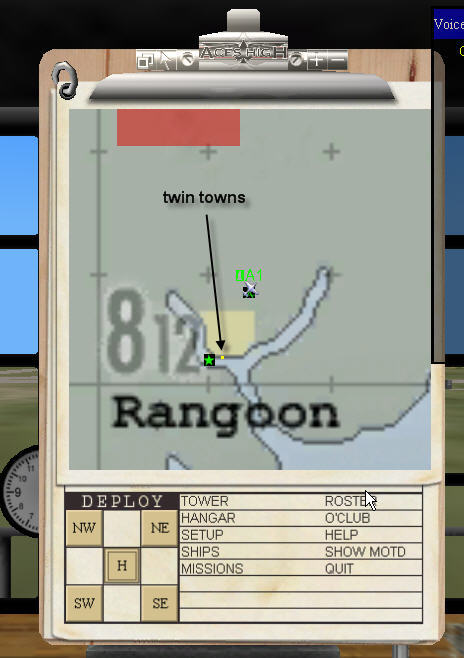
Figure 4: Location of target towns.
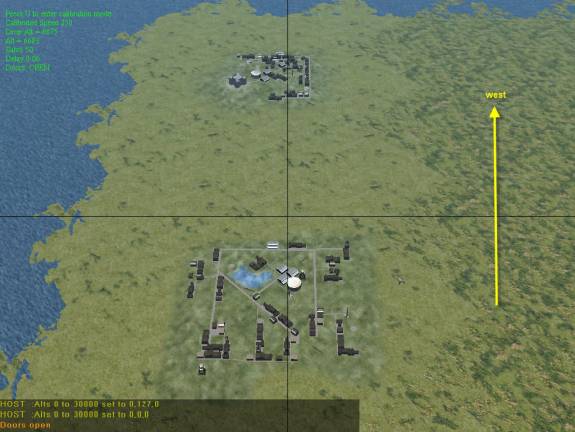
Figure 5: Map of the targets.
Sweep Group
A1 Squadron
Squadron leader: SlvrFox
Composition: 12 a6m2’s
Takeoff time: T+45 seconds
Channel: tune 111 text and voice
Fuel load: 100%
Takeoff field: Bangkok
Takeoff direction: NW
Briefing field: A5
Take off from Bangkok. Join up with N3 as Sweep Group. Head toward Rangoon under 12k altitude and max cruise settings. Avoid the radar circle (10 mile radius) at Moulmein. Your nominal path is to Rangoon, then Toungoo, then rampage around the Rangoon/Toungoo sector, spreading out a bit to see if there are any enemies in that area to kill. Fly safely -- you need not sacrifice yourselves to kill enemy aircraft (except for P-40’s). Your main goal is disruption and misdirection and, ultimately, clearing out the Rangoon towns area of enemies before the bombers get there. At some point in your patrol (if the enemy doesn’t find our bombers), I may call for you to fly east out of radar of Rangoon. This is for misdirection so that the enemy will think you are going east to rendezvous with bombers. After you are out of radar range, I will call for you to head back west to Rangoon towns area and CAP it. If the enemy does find our bombers, I will direct you to rendezvous with the bombers to provide detached escort. Please read the “Sweep” section above. If you run out of ammo or very low on fuel, you can refuel and rearm at Raheng -- no relaunching there, only refuel/rearm at the pad. If you need repairs and want to exit to tower then relaunch, you will need to go to Phitsanulok.
N3 Squadron
Squadron leader: ROC
Composition: 12 a6m2’s
Takeoff time: T+50 seconds
Channel: tune 123 text and voice
Fuel load: 100%
Takeoff field: Bangkok
Takeoff direction: NE
Briefing field: A5
You will be in A6M2’s this time, not A6M5’s. Take off from Bangkok. Join up with A1 as Sweep Group. Head toward Rangoon under 12k altitude and max cruise settings. Avoid the radar circle (10 mile radius) at Moulmein. Your nominal path is to Rangoon, then Toungoo, then rampage around the Rangoon/Toungoo sector, spreading out a bit to see if there are any enemies in that area to kill. Fly safely -- you need not sacrifice yourselves to kill enemy aircraft (except for P-40’s). Your main goal is disruption and misdirection and, ultimately, clearing out the Rangoon towns area of enemies before the bombers get there. At some point in your patrol (if the enemy doesn’t find our bombers), I may call for you to fly east out of radar of Rangoon. This is for misdirection so that the enemy will think you are going east to rendezvous with bombers. After you are out of radar range, I will call for you to head back west to Rangoon towns area and CAP it. If the enemy does find our bombers, I will direct you to rendezvous with the bombers to provide detached escort. Please read the “Sweep” section above. If you run out of ammo or very low on fuel, you can refuel and rearm at Raheng -- no relaunching there, only refuel/rearm at the pad. If you need repairs and want to exit to tower then relaunch, you will need to go to Phitsanulok.
Strike Group
If we get spotted too early, I might change the path of the Strike Group drastically, but the following is the plan if we are not spotted until closer to Rangoon.
B1 Squadron
Squadron leader: Snak
Composition: 9 Betties (Ju88A-4), 3 pilots, with 3 planes per pilot.
Takeoff time: T+10 seconds
Channel: tune 101 text and voice
Fuel load: 100%
Bomb load: 20 x 50 kg internal bombs. NO EXTERNAL BOMBS.
Takeoff field: Bangkok
Takeoff direction: SW
Briefing field: A2
Load only internal bombs this time. Take off from Bangkok, head south, and autoclimb at max throttle. Climb to 10k altitude. Once at 10k altitude, level out. Follow the flight path shown in Figure 1 at full throttle except as needed to keep the formation close together. Stay joined with B2 Squadron -- all bombers should be in one formation. Stay in autopilot as much as possible -- it will make formations and gunning easier. The target is the two Rangoon towns. See Figures 4 and 5. Drop your internal load on the western-most town (i.e., the first town you overfly), then head SE back to Bangkok. Remember to use .showjoin command to keep join popups from ruining your bomb run.
B2 Squadron
Squadron leader: Leigh
Composition: 9 Betties (Ju88A-4), 3 pilots, with 3 planes per pilot.
Takeoff time: T+0 seconds.
Channel: tune 102 text and voice
Fuel load: 100%
Bomb load: 20 x 50 kg internal bombs. NO EXTERNAL BOMBS.
Takeoff field: Bangkok
Takeoff direction: SE
Briefing field: A2
Load only internal bombs this time. Take off from Bangkok, head south, and autoclimb at max throttle. Climb to 10k altitude. Once at 10k altitude, level out. Follow the flight path shown in Figure 1 at full throttle except as needed to keep the formation close together. Stay joined with B1 Squadron -- all bombers should be in one formation. Stay in autopilot as much as possible -- it will make formations and gunning easier. The target is the two Rangoon towns. See Figures 4 and 5. Drop your internal load on the eastern-most town (i.e., the second town you overfly), then head SE back to Bangkok. Remember to use .showjoin command to keep join popups from ruining your bomb run.
A2 Squadron
Squadron leader: Bino
Composition: 12 a6m5’s
Takeoff time: T+15 seconds
Channel: tune 112 text and voice
Fuel load: 100%
Takeoff field: Bangkok
Takeoff direction: W
Briefing field: C13
A2 has had very low attendance. Thus, HQ Flight and A2 will fly in the same general area.
You will be in A6M5’s this time, not A6M2’s. Take off from Bangkok. Stay close on the bombers until we are past Tovay, and keep your eyes open for any enemy bogies to our northern side as we fly past Tovay. We don’t want to get spotted. Once past Tovay, set up detached escort of B1 squadron as shown in Figures 2-3. Fly at max-cruise settings (or less throttle so that you don’t get too far from bombers) until you spot enemy bogies, when you will go to max power. Stay within dots visual range of the bombers, but outside icon range when escorting. Fly at 11k altitude initially to be sure you are below 12k. If anyone hits 12k, we will alert the allies -- don’t do that until one of your pilots icons an enemy. Once the bombers hit Rangoon, escort them back to Bangkok in a position that seems best given the circumstances upon egress. Please read “Tactics for Detached Escort” section of orders.
A3 Squadron
Squadron leader: Badboy
Composition: 12 a6m2’s
Takeoff time: T+20 seconds
Channel: tune 113 text and voice
Fuel load: 100%
Takeoff field: Bangkok
Takeoff direction: E
Briefing field: A14
Take off from Bangkok. Set up close escort of B2 squadron. Fly at max-cruise settings until you spot enemy bogies. Assign individual fighters to individual bombers. Stay with your bomber. Please read “Tactics for Close Escort” section of orders. Fly initially at 11k. Do not hit 12k until you are released to do so, or we will tip off the enemy.
N1 Squadron
Squadron leader: Newman
Composition: 12 a6m5’s
Takeoff time: T+25 seconds
Channel: tune 121 text and voice
Fuel load: 100%
Takeoff field: Bangkok
Takeoff direction: SW
Briefing field: A11
Take off from Bangkok. Stay close on the bombers until we are past Tovay, and keep your eyes open for any enemy bogies to our northern side as we fly past Tovay. We don’t want to get spotted. Once past Tovay, set up detached escort of B1 squadron as shown in Figures 2-3. Fly at max-cruise settings (or less throttle so that you don’t get too far from bombers) until you spot enemy bogies, when you will go to max power. Stay within dots visual range of the bombers, but outside icon range when escorting. Fly at 11k altitude initially to be sure you are below 12k. If anyone hits 12k, we will alert the allies -- don’t do that until one of your pilots icons an enemy. Once the bombers hit Rangoon, escort them back to Bangkok in a position that seems best given the circumstances upon egress. Please read “Tactics for Detached Escort” section of orders.
N2 Squadron
Squadron leader: Skyman
Composition: 12 a6m5’s
Takeoff time: T+30 seconds
Channel: tune 122 text and voice
Fuel load: 100%
Takeoff field: Bangkok
Takeoff direction: SE
Briefing field: A8
Take off from Bangkok. Stay close on the bombers until we are past Tovay, and keep your eyes open for any enemy bogies to our northern side as we fly past Tovay. We don’t want to get spotted. Once past Tovay, set up detached escort of B1 squadron as shown in Figures 2-3. Fly at max-cruise settings (or less throttle so that you don’t get too far from bombers) until you spot enemy bogies, when you will go to max power. Stay within dots visual range of the bombers, but outside icon range when escorting. Fly at 11k altitude initially to be sure you are below 12k. If anyone hits 12k, we will alert the allies -- don’t do that until one of your pilots icons an enemy. Once the bombers hit Rangoon, escort them back to Bangkok in a position that seems best given the circumstances upon egress. Please read “Tactics for Detached Escort” section of orders.
HQ Flight
Squadron leader: Yojimbo
Composition: 4 a6m5’s
Takeoff time: T+35 seconds
Channel: tune 131 text and voice
Fuel load: 100%
Takeoff field: Bangkok
Takeoff direction: W
Briefing field: A8
A2 has had very low attendance. Thus, HQ and A2 will protect the same general area.
Take off from Bangkok. Stay close on the bombers until we are past Tovay, and keep your eyes open for any enemy bogies to our northern side as we fly past Tovay. We don’t want to get spotted. Once past Tovay, set up detached escort of B1 squadron as shown in Figures 2-3. Fly at max-cruise settings (or less throttle so that you don’t get too far from bombers) until you spot enemy bogies, when you will go to max power. Stay within dots visual range of the bombers, but outside icon range when escorting. Fly at 11k altitude initially to be sure you are below 12k. If anyone hits 12k, we will alert the allies -- don’t do that until one of your pilots icons an enemy. Once the bombers hit Rangoon, escort them back to Bangkok in a position that seems best given the circumstances upon egress. Please read “Tactics for Detached Escort” section of orders.
LR Escorts
Squadron leader: Ramzey
Composition: 4 Me110c’s, 4 a6m5’s
Takeoff time: T+40 seconds
Channel: tune 132 text and voice
Fuel load: 100% + drop tanks for a6m5’s
Takeoff field: Bangkok
Takeoff direction: E
Briefing field: A11
Take off from Bangkok. At first, set up escort within icon range of B1. Do not assign your pilots to individual bombers. Once any of your guys icon enemies, you are now free to roam as you see fit and are not restricted to close escort. Do not get too far from the bombers so that you can stay with the action, but you are free to go where you think is best. If we spot A-20’s, your Me110c’s might be vectored to them to kill them. The Me110c is the only plane that is nearly as fast as the A-20, and we don’t want them shadowing our bombers. Remember you get drop tanks at the start -- and you will want them -- but remember to drop them when you go into combat! J
Reasons for Those Who Are Interested
Since the enemy has seen both conservative routes from us and since up the middle was judged too risky for the bombers, we are mixing it up this time the way that seems safest. The sweep is to distract the enemy, kill some of the enemy, and perhaps confuse him into thinking our bombers are coming up the middle or from the east. The bombers are taking a the route they are in an attempt: (1) to do a different route from last time, (2) to keep from getting spotted near Tovay, (3) to keep from taking the up-the-middle route judged too risky, and (4) to take enough time so that the enemy gets very edgy and either spread out or concentrated back at Rangoon where our sweep can cause trouble.
End of Orders
Good luck to all.
Brooke
Commanding Officer
IJAF
Rangoon, ‘42