
Players should register for this Aces High scenario to play in it so that they can get mission orders, although walkons are allowed to show up in the Special Events Arena on game day to see if there are any open positions to fill. This scenario will be a four-frame event (four battles) with one test frame (or "practice" or "beta" frame). The practice frame is on July 26, 2008. Frames 1-4 are on August 2, 9, 16, and 23, 2008. Start Time is 3 pm US Eastern Daylight Time. (For how that translates to your time, here is a time converter.) All frames run in the Special Events Arena.
Important: Please show up on or before Start Time to play. The arena will be closed to admittance at Start Time. If you are disconnected and can't get back in, you can private message the CM (Roscoroo) from the Main Arena by typing ".p roscoroo let me in" into your radio text buffer. (Start Time is *not* Takeoff Time -- for the distinction, please see the "Mission Timeline" section.)
It is January, 1942, and the forces of Imperial Japan have been unstoppable. They have stormed out of their home islands and have swept all opposition before them. In just the past single month alone, they have advanced in China, annihilated the US Pacific Fleet at Pearl Harbor, invaded Thailand and Malaya, captured Guam and the Gilbert Islands, sunk the capital ships HMS Repulse and HMS Prince of Wales, invaded Burma, the Phillipines, and the Dutch East Indies, and captured Wake Island and Hong Kong.
China, already invaded, may hang in the balance. Allied forces -- American, British and British Commonwealth, Dutch, and Australian forces -- are doing what they can, but there aren't many of them left in the area. One critical task for the allies is to keep materiel flowing to China, in an effort to keep it equipped enough to fight back. With Southeast Asia cut off by Japanese expansion and dominance, the best route left is the renowned Burma Road. The allies can land materiel at Rangoon and use convoys to move it into China.
The Japanese know this and are working not just to conquer China from within but to strangle it from without by cutting supply lines. They have already established themselves in Thailand and are now entering Burma. The goal: take Rangoon -- cut the Burma Road. They are pushing forward, and the Imperial Japanese Army Air Force is ranging ahead, preparing the way.
The allied air forces consist of an assortment of Royal Air Force aircraft, manned by British and Commonwealth pilots, and a group from the US that has arrived only shortly before -- the American Volunteer Group, known as "The Flying Tigers".
In this Aces High scenario, the RAF and AVG forces (flying Hurricane Mk I's, Spitfire Mk I's, P-40B's, P-40E's, F4F-3's (FM-2's), Beafighters (A-20G's), and Buffalos (SBD's)) defend Rangoon against the IJAAF (flying A6M2's, A6M5b's, Betties (Ju 88's), and Dinahs (Bf 110C's)). Pilots get one life in aircraft (except for a limited number of 2nd lives in Buffalos) and unlimited lives as gunners on Betties. There will be four frames (battles), each lasting several hours.
The IJAAF goal is to bomb Rangoon into submission. No force on earth has yet been able to stop them. Can a regrouped RAF and the AVG make a stand to preserve the last artery of supply into China?
In real life, the Allies were facing much older and slower Japanese planes. Since we do not have these available, A6M Zeros and Ju-88's (as Betty bombers) are being used, but in smaller numbers than actually took place relative to the Allied planes. The situation being depicted is that after an initial bloody nose was delivered by the AVG and RAF, the Japanese pulled in stronger air assets (using more modern aircraft) to wipe the skies over Rangoon clean so they could take the city.
Commentary: This is still a tough event for both sides. Fighters will meet co-altitude which is good for the IJA, but numbers are much closer which gives the IJA fewer options - the balance of close escort to sweeps is much keener.
Allies: Prevent the destruction of Rangoon and fighter assets.
Japan: Bomb Rangoon, inflict damage on Allied air assets.
The following is a summary of some rules that regular pilots must enforce upon themselves during play (as opposed to those rules that are enforced by settings or enforced by how CM's or CO's set things up prior to frame start). This is intended as a handy summary list. You still should know the rest of the rules as well. For details of what a term means exactly (such as what is a "life", what constitutes "nearest non-flashing base", and so on), see the rules.
The Allies have a mixed bag of defending fighters, supported by a flight of Bristol Beaufighters.
The IJA has a solid package of A6M Zeroes and 2 medium bomber squadrons. A long-range fighter group of Ki-46-III's and Naval A6M5 Zeroes is capable of staying with the bombers for the duration of their flight.
| ALLIED FORCES | JAPANESE FORCES |
| HQ @ 4 P40E | HQ @ 4 A6M5b |
| RECON @ 4 Beaufighter (A20G) | L.R. ESCORT @ 4 x Ki-46-III Dinah (Me110C) + 4 x A6M5b |
| 1 RAF Sqdn @ 12 Spit I | 2 IJA Bomber Sqdn @ 3 Betty (Ju-88) Formations |
| 1 RAF Sqdn @ 12 Hurri I | 3 IJN Fighter Sqdn @ 12 A6M5b |
| 1 AVG Sqdn @ 12 P40B | 3 IJA Fighter Sqdn @ 12 A6M2 |
| 1 AVG Sqdn @ 12 P40E | |
| 1 RAAF Sqdn @ 12 F4F-3 (FM2) | |
| * "Reserve" Sqdn @ 12 Buffalo (SBD) |
This is 68 allied fighter pilots to 90 axis pilots (84 axis fighter pilots, 6 axis bomber pilots). This is a ratio of total_allied:total_axis of 1:1.32.
Notes:
Points are pretty straightforward. The Allies get points for downing bombers. The Japanese get points for destroying buildings. It all comes down to if the Japanese bombers can get to target and back week after week. There are also bonuses for "blow-out" results.
| Objective | Team | Points |
| Per bomber destroyed. | Allies | -1 |
| Per bomber dropping on Rangoon (see below). | Japan | +1 |
| No bombs landing on Rangoon. | Allies | -5 |
| No bombers lost (only if bombs delivered on Rangoon). | Japan | +5 |
| Per Betty squadron forced to break formation or change altitude for reasons other than getting below cloud cover or landing. | Allies | -3 |
| Per IJA squadron which takes > 50% losses in a mission. | Allies | -1/2 |
| Per Allied squadron which takes > 50% losses in a mission. | Japan | +1 |
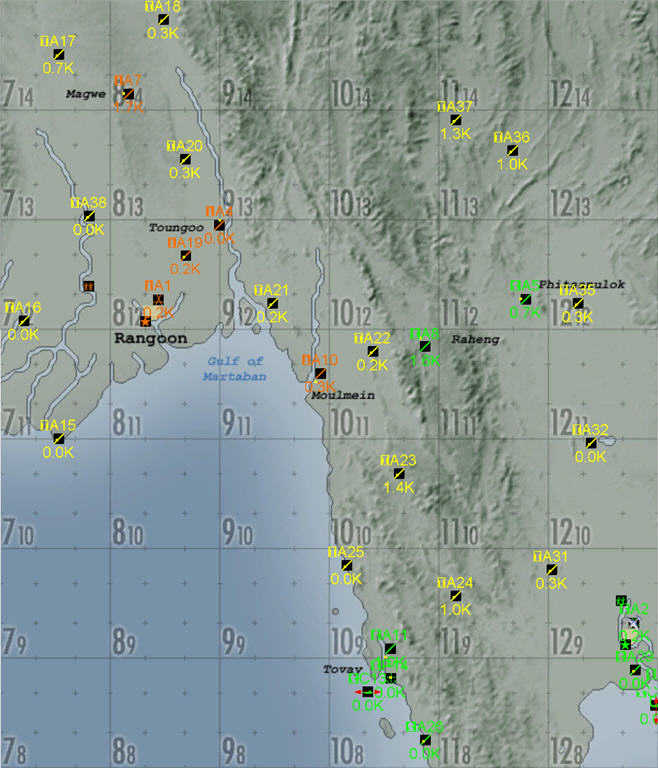
If a bomber pilot gets at least one "object destroyed" from his bombing of Rangoon, then he gets +1 for each of his bombers that was present in his formation while over Rangoon. For target purposes, Rangoon is both of the two cities near and just south of A1. One is an HQ city, and the other is the town for A1 -- collectively, they are Rangoon.
The "Bettys break formation" bonus basically is there to keep the Ju-88's from diving like maniacs towards the target or for home. That's not how the IJA flew. The Betty's must maintain a formation in level flight. If they decide to break or dive out and run on the deck to avoid getting shot down, that's a calculated risk as it effectively gives the Allies 3-kills worth of points. This rule is released once the Betty's are within a sector of Bangkok - then they can run for the safety of their AAA. The Betty's may also dump 500ft of altitude after their bomb run - a brief dive to regain speed from the turn for home.
| Victory Level | Mission Average |
| Japanese Decisive Victory | +15.00 - ++ |
| Japanese Major Victory | +10.00 - +14.99 |
| Japanese Minor Victory | +5.00 - +9.99 |
| Draw | +4.99 - -4.99 |
| Allied Minor Victory | -5.00 - -9.99 |
| Allied Major Victory | -10.00 - -14.99 |
| Allied Decisive Victory | -15.00 - -- |
Please show up no later than Start Time. The arena is closed to admittance right after Start Time. Takeoff Time is typically roughly 30 minutes after Start Time (but it varies and is subject to CM's judgement).
The following are times with offsets given in minutes.
| Time | Event |
| S (Start Time) |
|
| S + 25 (approx. = T-10) |
|
| T-5 (Takeoff Countdown) |
|
| T-0 (Takeoff) |
|
| T+15 |
|
| T+180 (Nightfall) |
|
| T+190 (Frame End) |
|
If prior to T+180, combat is finished and the CO's say that they are done for the day, the CM can end the frame earlier than T+190.
Terrain. rangoon.res
Wind. 0 mph. -127 downwind at 16,000 ft -- remember -127 for a downwind.
Clouds. Some fleecy clouds if possible and a thin, transparent layer at 12,200 ft.
Object down time. Destroyed objects stay destroyed for the frame, but are restored prior to next frame.
Destroyed Objects. The ack at A19, A20, A21, A22, and A35, plus whatever other acks the CM sees fit.
Adjust Time. Go into "Options->Arena Setup->Environment->Adjust Time". At T-5, set New Time to 05:55 and Multiplier to 3.8333. This causes takeoff to happen at 06:00 (sunrise) and nominal end of frame (3 real hours later) to be at 5:30 pm (17:30).
|
Setting Name |
Value |
Explanation |
|
BomberWarningRange |
52,800 |
Bases flash when enemy is 10 miles away. |
| CommunicationFlags | 0 | No kill messages, ch 1 disabled. |
|
DownTimeMult |
200 |
Destroyed objects stay destroyed. |
|
ExitWhileMoving |
332 (gunner, boat, amphib, chute) |
No exit while moving, except for gunner, boat, chute, and amphib. |
|
FighterWarningRange |
52,800 |
Bases flash when enemy is 10 miles away. |
|
FlightModeFlags |
1152 (Formations Enabled and Auto Calibrate Bomb Sight) |
Formations. Easy-mode bombsight. |
|
FogVisibilityMiles |
15.0 |
15 miles visibility, or at CM's discretion. |
|
FuelBurnRateMult |
1.0 |
Fuel burn rate. |
| GroundAutoLethality[Armored] | 0.1 | To make sure puffy ack lethality is reduced. |
| GroundAutoLethality[Hard] | 0.1 | To make sure puffy ack lethality is reduced. |
| GroundAutoLethality[Soft] | 0.1 | To make sure puffy ack lethality is reduced. |
|
KillShooter |
0 |
KillShooter is off -- be careful not to shoot your own countrymen. |
|
PerkPointsDisabled |
1 |
Perk points are disabled. |
|
PlayerResupplyTime |
0 |
No resupply. |
|
RadarMode[Bishops] -- allies |
56 (Disable Friendly Counters, Disable Enemy Counters, and Tower Enemy) |
Allied dot radar in range around bases. |
|
RadarMode[Knights] -- axis |
48 (Disable Friendly Counters and Disable Enemy Counters) |
No radar. |
|
RadarMode[Rooks] |
48 (Disable Friendly Counters and Disable Enemy Counters) |
No radar. |
|
RandomRotate |
0 |
|
| TowerBasedRadarRange | 52,800 | 10 mile range on radar. |
|
ViewModeFlags |
2 |
External view for bombers only. |
| WarningFlags[Rook] | 0 | All off -- no base flashing. |
|
Object Name |
Hardness |
Explanation |
| Bombable | 3.3 | Buildings in city near A1 at 3300 lbs. |
|
HQ |
3.3 |
Hardness of HQ building in city near A1 at 3300 lbs. |
| Town | 3.3 | Buildings in town near A1 at 3300 lbs. |
All other settings are the default settings listed here: http://ahevents.org/images/stories/scenarios_images/defaultSettingDocument/defaultArenaSettings.html
MOTD. The following can be copy and pasted to use as the MOTD, with appropriate number for frame number.
Welcome to frame 1 of the scenario Rangoon, '42!
If you need back in and the arena is locked, please
enter ".p roscoroo let me in" into a radio text buffer
such as from the Main Arena.
Allies = Bishops
IJAAF = Knights
walkons = Rook
If you are not registered, please change to country Rook,
go to the tower at field A3, and type on channel 200,
"Walkon requesting assignment."
CM checklist. Prior to Start Time:
| Time | Event |
| S (Start Time) |
|
| S + 25 (approx. = T-10) |
|
| T-5 (Takeoff Countdown) |
|
| T-0 (Takeoff) |
|
| T+190 (Frame End) |
|
Admittance into the Special Events Arena will be turned off right after Start Time elapses. This is because the sides in the scenario need a little time to get their players assigned, briefed, and settled before takeoff. We have found -- based on many previous scenarios -- that if admittance to the arena is not closed, players drift in late, and curious players who haven't heard of scenarios before continue to pop in to see what is going on. While we very much want players in scenarios, it is a large organizational problem to deal with players trickling in right up to takeoff or to deal with new players asking lots of questions about scenarios while trying to get things ready for takeoff. To accomodate players who show up on time but get disconnected in the initial stages of the scenario, players can contact the CM for admittance.
We chose to use the FM2 as a stand in for the F4F-3 instead of the F4F-4. Which one to pick depends a little bit on which differences are more important, since neither the F4F-4 nor the FM2 are exact matches for the F4F-3 performance.
The F4F-4 was an F4F-3 with more armor, self-sealing fuel tanks, folding wings, up to 6 guns (instead of 4), and a slightly more-powerful engine. With the added weight, the F4F-4 was signficantly slower from about 15k on up and significantly worse at climbing than the F4F-3.
The FM2 had a little more power than the F4F-4, but was lighter and went back to 4 guns. As a result, it had climb like the F4F-3 and a gun package like the F4F-3. On non-WEP, it was a little faster than the F4F-3 below about 8k, about the same from 8k to 15k, and slower from 15k on up. With WEP, it's faster still below 8k, a little faster from 8k to 15k, and still slower above about 15k.
The main thing, though, is the gun package. While the F4F-4 can be selected with the 4-gun package, it is very easy to mistakenly take the 6-gun package in the scenario, and we felt that enforcing 4 guns and getting a better match on climb was more important than extra speed down low (especially since the Ju 88 is faster than the Betty).
Data for the above taken from America's Hundred Thousand, by Dean.
In real life in this period in Burma (late 1941 to early 1942), the Japanese pushed the allied air forces out of Burma. Then the allies came and took it back starting late 1943 and early 1944. In this first period, the IJAF had Ki-21 Sally bombers (60th, 12th, 98th Sentai), Ki-43 Hayabusa fighters (64th Sentai, etc.), Ki-27 Nate fighters, and some other types of lower performance. They didn't have Betties, Zeros or Dinahs. Likewise, the allied forces had P-40B's (AVG 1st, 2nd, and 3rd Sqdn), Hurricane Mk IIa's (RAF 17 and 135 Sqdn and 1 other), and F2A Buffaloes (RAF 67 Sqdn). They didn't have P-40E's, F4F's, Spitfires, or Beaufighters.
Perhaps a mix of aircraft that would be more-historically accurate would be P-40B's, Hurricane Mk I's, and F4F-3's (with 4 guns, as a good fit for the F2A, actually -- see America's Hundred Thousand for a comparison of F2A vs. F4F) for the allied forces (with the ratio of P-40's:Hurris:Buffaloes being 1:1:0.333) and Ju 88's (as the best fit for the Ki-21), A6M2's (for Ki-43's), and D3A's (for Ki-27's) for the Japanese forces (with the ratio of A6M2:D3A being 1:1). However, historically, the IJAF forces drastically outnumbered the allied forces, so if these more-realistic aircraft were used (where IJAF fighters are much worse than allied fighters), we'd also need more-realistic side balance with the IJAF probably having, say, 3-5 times as many players as the allied side. DoK, the original designer, picked more-contemporary aircraft and more-even player numbers. We're keeping it that way (1) because changing as described above would be a major change, requiring redesigning the scoring conditions, experimenting with side balance and playability, etc. and (2) because this scenario is already delayed compared to our originally desired schedule. Maybe in the future version, we'll try a more-historically accurate mix of aircraft.
In the first running of Rangoon, '42 in 2004, there were only the stated airfields for each side (Rangoon, Bangkok, etc.). Post-2004, the terrain was converted to the new terrain format and numerous vehicle bases were added so that the terrain could be used for other special events and different time periods. For this scenario to work, it is important that all those extra vehicle bases do not provide greatly expanded radar or base-flashing coverage for the two sides. Otherwise, possible approach routes for bombers and possible scouting paths for the allies would be greatly restricted. Thus, most the vehicle bases were turned into Rook fields, and Rook radar and base flashing is turned off. The bases still would shoot at anyone approaching, though, so in addition the CM will prior to start of frame destroy the ack at some of the bases that are closest to possible action. There are too many bases to do this for all of them, even the out-of-the-way ones -- so if in doubt, stay out of ack at Rook bases.
In scenarios, there are times when using techniques to increase aircraft range might be important. Setting the engine's RPM and manifold settings to the "max cruise" settings in the E6B will result in more range than full military power and is a good choice for a pilot who has no idea what might work better. However, there are times when settings different from the max-cruise settings will result in even greater range, such as lowering the RPM farther than max-cruise settings. Also, the E6B information does not suggest altitudes for cruising. If you have a longer distance to travel, it may be best to climb at military power to higher altitude, then lower the RPM below the max-cruise settings. For shorter distances or for aircraft that do not perform well at high altitude, medium altitudes might work better. Figuring out a plan for fuel management is, for some scenarios, a useful part of preparation.
Some scenarios implement wind. Level bombing in wind is a bit different than bombing without wind, in terms of accuracy and techniques that are best to hit targets. You might want to suggest to your bomber pilots that they practice bombing in wind prior to the scenario if they are not familiar with the impact of wind.
Scenario design: DoK
Scenario CM: Roscoroo
Rules writeup: Brooke
Allied CO: Husky01 ("BearKats" is his handle in the arenas)
Axis CO: leitwolf
This section mentions the changes in each version, so that when changes are made to this document, people don't need to read the whole document to find out where the changes are.
Note on terminology: In this section, "Clarified" has a very precise meaning. If a rule is listed as being "Clarified", it means that the rule and its intent is not being changed but that the explanation herein is being improved to make the rule and its intent more clear. Rules are sometimes Clarified during a scenario based on player questions or misunderstandings about wording.
v2.0, 5/4/2008
-- Start of the rules document.
-- Require Ju 88's to carry full bomb load.
-- Changed RAAF FM-2's to be RAF FM-2's, as there were no RAAF squadrons in
Burma at this time. There were Commonwealth pilots flying for RAF, though.
-- Various questions on rules modifications and sections marked for filling
in are denoted by brackets [].
v2.1, 6/21/2008
-- Added explanation of FM2 use instead of F4F-4.
-- Took out P-39.
-- Added section explaining "Aircraft Set Overall".
-- Added BearKats as allied CO.
-- Added some links to historical information.
v2.2, 6/27/2008
-- Took out references to allies bombing Japanese ships. The allies had no Boston
III's and no scoring in the table for bombing ships. It was a leftover from
an earlier version of the scenario design and is now removed.
-- Removed ability for CO's to call mission aborts (which would cancel frames
of the scenario).
-- Clarified the 12k altitude rule.
-- Put in a 15k downwind to cut down on gross violation of the 12k altitude
rule.
-- Got rid of sector counters for aircraft at high altitude. Alt limits accomplished
by downwind instead.
-- Changed bomber scoring to be +1 per bomber that drops on Rangoon instead
of +1 per building destroyed (which is hard to calibrate with building hardness).
-- Defined "drops on Rangoon" to mean that the bomber pilot must get
at least one "object destroyed" for his drop to count.
-- Fixing table of arena settings to match other descriptions in rule set.
-- Set building hardness so that a Ju 88 bomber's full load (4x500 kg + 20x50
kg = 6600 lb) can kill 2 buildings (hardness of 3300).
-- Filling in some of summary of player-enforced rules. Moved it to a more prominent
location.
-- Filled in table of contents.
-- Clarified that Beaufighters can fly singly.
v3, 7/2/2008
-- leitwolf added as IJAAF CO.
-- Clarified re-arming and re-planing rules.
-- Clarified one life to live.
v4, 7/3/2008
-- Set Roscoroo as CM for this one.
-- Added dates and times.
-- Removed "Ditching and Landing" section, as it doesn't apply. Is
a holdover from an earlier incarnation that contemplated attrition rules.
-- Got rid of some redundant information.
-- Took out question about wind. Just left it at 0 mph as it was originally.
-- Took out option for second mission. It was never used in first run of Rangoon,
and it makes the scenario timeline upredictably long and harder to manage. Time
limit on mission set to 3 hours from takeoff.
-- Allied pilots replaning in SBD's must now check in with CO, not with CM.
-- Clarified "one life to live" rule.
-- In the "Rearming" section, clarified which planes can replane at
which fields and rearm at which fields, clarified that there are more fields
(i.e., some that are not allowed to be used), and stated the obvious (that there
may be penalties assigned if pilots rearm or replane at unallowed fields).
-- Clarified "Max Altitude" rules.
-- Clarified "Mission Timeline".
-- In "Settings" section, added "Adjust Time" settings,
MOTD (for easy copy and paste), and CM steps/checklist.
v5, 7/5/2008
-- New map reflects what is the actual terrain available for the scenario. See
additional notes about map.
-- In "Max Altitude" section, there is a downwind now at 16k, not
15k. The settings allow wind settings only every 2k.
-- In "Radar" section, clarify that all non-Rook bases will flash
if an enemy is within 10 miles.
-- "Rearming" and "Flight Boundaries" sections reworded
to better correspond with new map.
-- Cleaned up "CM checklist" (added setting of downwind, etc.).
-- In "Settings", added a couple of missing settings and corrected
hardness settings.
-- Added explanation for Rook bases in the "Rook Bases" section.
v6, 7/6/2008
-- Changed the FM2 squadron designation back to RAAF from RAF.
v7, 7/7/2008
-- In "Mission Timeline", corrected that IJAAF bombers must launch
by T+15, not allied bombers (of which there are none).
v8, 8/1/2008
-- Added "Objects Destroyed" with a list of the acks in the "Settings"
section for CM reference during setup.
-- In "Special Rules" section, clarified section that talks about
expanded registration, and changed it so that the axis gets 1 additional bomber
slot for every new squadron added to the allied side.
-- Removed notice that the rules are still under development.
v9, 8/8/2008
-- In "Settings", puffy ack lethality reduced to account for substantial
increase in default puffy ack lethality in Aces High since last running of Rangoon.
-- Took out references to particular altitudes in the "Increasing Aircraft
Range" section (such as 25-35k, which doesn't apply to Rangoon) to make
the text generically applicable to all scenarios.
-- In "Special Rules", clarified that SBD's may not use rear guns
(as they are Buffalo, i.e. fighter, analogs).
v10, 8/14/2008
-- Made the distinction between Start Time and Takeoff Time more obvious in
"Mission Timeline" section.
-- In first paragraph and again in "Dates and Times", the distinction
is now specially noted, and the reader is referred to "Mission Timeline".